In our previous post, we have developed our understanding for OSPF Routing protocol introduction, in this lesson we shall learn basic OSPF configuration with the help of a basis topology. It is recommended to learn the basics of OSPF before diving into the configurations part.
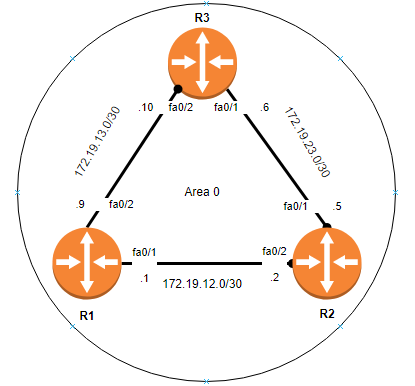
For the purpose of OSPF basic configuration we shall use above topology. Keeping in mind that all interfaces are already configured, we shall move towards configuring OSPF. Also note that all routers are in OSPF area 0. We will start with the configuration on R1 & R2 respectively.
R1(config)#router ospf 1
R1(config-router)#network 172.19.12.0 0.0.0.3 area 0
R2(config)#router ospf 22
R2(config-router)#network 172.19.12.0 0.0.0.3 area 0
OSPF Commands Explanation
So, lets understand above commands first, i have entered router ospf command to get into the OSPF configuration. The number 1 and 22 is process ID for OSPF and you can choose any number you like and does not have to match.
The second command is to use the network command to advertise the networks into OSPF, next to network address is the wild card subnet mask. A wild card subnet mask is the reverse of subnet mask which means that in binary, the 1s with 0s are flipped compared with other subnet mask and vice versa.
At the end, we use area command to mention the OSPF area. In our sample topology, all our routers are in area 0.
ALSO READ
Once both routers R1 and R2 exchange hello packets and if all goes well, both routers will form OSPF neighborship and you will see message on your console like below.
R1# %OSPF-5-ADJCHG: Process 1, Nbr 172.19.12.2 on FastEthernet0/1 from
LOADING to FULL, Loading Done
R2# %OSPF-5-ADJCHG: Process 1, Nbr 172.19.12.1 on FastEthernet0/2 from
LOADING to FULL, Loading Done
We can verify the OSPF neighborship using the show commands as follows: “show ip ospf neighbor” is great command to verify the neighborship status. You can see from the below output that neighbourship is changed to full.
R1#show ip ospf neighbor
Neighbor ID Pri State Dead Time Address Interface
172.19.12.2 1 FULL/BDR 00:00:32 172.19.12.2 FastEthernet0/1
OSPF Router ID
Each OSPF router has a router ID which is determined from the highest active IP address on the router. if there is a loopback interface configured, that loopback interface will become the router ID. Currently we do not have a loopback interface, lets verify current OSPF router ID.
R1#show ip protocols
Routing Protocol is "ospf 1"
Outgoing update filter list for all interfaces is not set
Incoming update filter list for all interfaces is not set
Router ID 172.19.12.1
R2#show ip protocols
Routing Protocol is "ospf 22"
Outgoing update filter list for all interfaces is not set
Incoming update filter list for all interfaces is not set
Router ID 172.19.12.2
As we can see that both routers have used their highest active IP address as router IDs. Lets change this by configuring loopback address.
R1(config)#interface loopback 0
R1(config-if)#ip address 1.1.1.1 255.255.255.0
This is how loopback address is configured on Cisco router, now you need to reset ospf process for the change to become effective.
Which command is used to reset OSPF process?
CAUTION: DO NOT USE RESET COMMAND IS PRODUCTION AS IT WILL RESET OSPF PROCESS AND ALL YOUR NEIGHBORSHIPS WILL BE AFFECTED.
R1#clear ip ospf process
Reset ALL OSPF processes? [no]: yes
Once OSPF process is reset, now if you check the router ID will be updated to loopback IP address.
R1#show ip protocols
Routing Protocol is "ospf 1"
Outgoing update filter list for all interfaces is not set
Incoming update filter list for all interfaces is not set
Router ID 1.1.1.1
We can also configure the router ID manually which is considered as best practice. Now we shall configure router ID on R2 manually as follows:
R2(config)#router ospf 22
R2(config-router)#router-id 2.2.2.2
R2(config-router)#end
R2#clear ip ospf process
Reset ALL OSPF processes? [no]: yes
Currently we have an OSPF neighbor adjacency between R1 and R2. Let’s configure our routers so that remaining routers also become OSPF neighbors:
R1 OSPF Configuration
R1(config)#router ospf 1
R1(config-router)#network 172.19.12.0 0.0.0.3 area 0
R1(config-router)#network 172.19.13.0 0.0.0.3 area 0
R2 OSPF Configuration
R2(config)#router ospf 22
R2(config-router)#router-id 2.2.2.2
R2(config-router)#network 172.19.12.0 0.0.0.3 area 0
R2(config-router)#network 172.19.13.0 0.0.0.3 area 0
R3 OSPF Configuration
R1(config)#router ospf 1
R3(config-router)# router-id 3.3.3.3
R3(config-router)#network 172.19.12.0 0.0.0.3 area 0
R3(config-router)#network 172.19.13.0 0.0.0.3 area 0
Now lets verify that our neighborships have formed by executing the command “show ip ospf neighbor”
R1#show ip ospf neighbor
Neighbor ID Pri State Dead Time Address Interface
2.2.2.2 1 FULL/BDR 00:00:36 172.19.12.1 FastEthernet0/1
3.3.3.3 1 FULL/DR 00:00:31 172.19.23.2 FastEthernet1/0
In this lesson we have configured basic OSPF configuration and verified their OSPF neighborship using show commands. I hop this has been informative for you an would like to thank you for viewing.