Static NAT is a type of NAT configuration in which a particular IP address and port combination on the inside network is always translated to a specific IP address and port combination on the outside network. This type of NAT is useful when you need to make a specific device on the inside network accessible from the outside network, such as a server that needs to be accessible from the Internet.
To configure static NAT on a Cisco ASA, follow these steps:
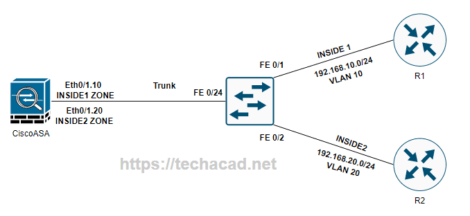
- Define the inside and outside interfaces. The inside interface is the interface that connects to the devices on the inside network, and the outside interface is the interface that connects to the outside network. For example:
interface GigabitEthernet0/0
 nameif inside
 security-level 100
 ip address 192.168.1.1 255.255.255.0

interface GigabitEthernet0/1
 nameif outside
 security-level 0
 ip address 10.0.0.1 255.255.255.0
- Define the static NAT translation. The static NAT translation specifies the inside and outside IP addresses and port combinations that should be translated. For example:
static (inside,outside) 10.0.0.100 192.168.1.100 netmask 255.255.255.255
This translation will cause any traffic from the outside interface with a destination IP of 10.0.0.100 to be translated to 192.168.1.100 on the inside interface.
- Enable NAT on the inside interface. NAT must be enabled on the inside interface to allow traffic to be translated from the inside to the outside network. This is done with the
natcommand:
nat (inside) 1 0.0.0.0 0.0.0.0
This command will enable NAT on the inside interface and allow all traffic from the inside to be translated to the outside interface.
- Enable NAT on the outside interface. NAT must also be enabled on the outside interface to allow traffic to be translated from the outside to the inside network. This is done with the
natcommand:
nat (outside) 0 access-list nat_acl
This command will enable NAT on the outside interface and allow only traffic that matches the nat_acl access list to be translated to the inside interface.
- Create an access list to define the traffic that should be translated. The access list is used to define the traffic that should be translated by NAT. For example:
access-list nat_acl extended permit ip any host 10.0.0.100
This access list will allow any traffic from the outside network to be translated to the inside device with an IP address of 10.0.0.100.
- Save the configuration and test the NAT translation. After configuring NAT, save the configuration and test the NAT translation by attempting to access the inside device from the outside network.
For example, if you have a web server on the inside network with an IP address of 192.168.1.100 and you have configured static NAT to translate 10.0.0.100 to 192.168.1.100, you should be able to access the web server from the outside network by using the IP address 10.0.0.100.
I hope this helps! Let me know if you have any questions.