Install LEMP (Nginx, Mysql & PHP7.2) & Configure on Ubuntu
In this tutorial, we will learn to install LEMP stack on Ubuntu machine in step by step procedure. This ubuntu machine can be your local installation or your purchased VM instance from Digitalocean, Vultr or Cloud Hosting plateforms like GCP, Amazon or Microsoft Azure. In either case, steps are the same so lets begin.
First we shall update our packages by issuing below commands.
Update Packages
sudo apt update && sudo apt upgrade
Install Nginx
$sudo apt install nginx -y
Once nginx installation finished, Start & enable service by typing.
$sudo systemctl nginx start
$sudo systemctl nginx enable

Configure Firewall
To allow HTTP and HTTPS traffic through ubuntu firewall we need to edit the rules as follows, if you are interested in learning more about UFW firewall, visit our post regarding installation & configuration of UFW firewall.
$sudo ufw allow HTTP
$sudo ufw allow HTTPS
$sudo ufw enable
Install Mysql
Next, proceed for the installation of mysql as appended procedure, “-y” is for accepting the default prompt for installation.
$sudo apt install mysql-server -yOnce the installation is finished, to check if the service is active and enabled, proceed as follows:
$sudo systemctl status mysql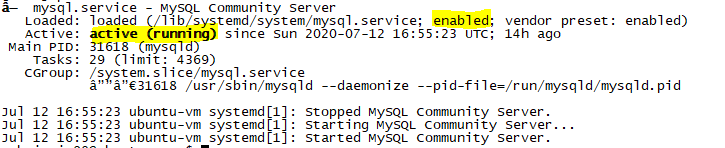
To secure the installation, perform the following steps:
$sudo mysql_secure_installationSecuring the MySQL server deployment.
Connecting to MySQL using a blank password.
VALIDATE PASSWORD PLUGIN can be used to test passwords
and improve security. It checks the strength of password
and allows the users to set only those passwords which are
secure enough. Would you like to setup VALIDATE PASSWORD plugin?
Press y|Y for Yes, any other key for No:nEnter Y for enabling password validation otherwise press n and ENTER.
Please set the password for root here.

New password:

Re-enter new password:
Nest remove anonymous users by pressing Y and ENTER.
By default, a MySQL installation has an anonymous user,
allowing anyone to log into MySQL without having to have
a user account created for them. This is intended only for
testing, and to make the installation go a bit smoother.
You should remove them before moving into a production
environment.

Remove anonymous users? (Press y|Y for Yes, any other key for No) : Y
Next disallow root logins remotely, by pressing Y and ENTER.
Normally, root should only be allowed to connect from
'localhost'. This ensures that someone cannot guess at
the root password from the network.

Disallow root login remotely? (Press y|Y for Yes, any other key for No) :Y
Remove test database, as we shall be configuring our own database for websites. Press Y and ENTER to continue.
By default, MySQL comes with a database named 'test' that
anyone can access. This is also intended only for testing,
and should be removed before moving into a production
environment.

Remove test database and access to it? (Press y|Y for Yes, any other key for No) : Y
Reload the privileges table to take effects immediately. Press Y and ENTER to proceed.
Reloading the privilege tables will ensure that all changes
made so far will take effect immediately.

Reload privilege tables now? (Press y|Y for Yes, any other key for No) : Y
All Done. Here Mysql installation completes.
Install PHP
To install PHP, execute below command line with sudo priviledges.
$sudo apt install php-fpm php-mysqlOnce installation is complete, to check which version of PHP got installed, execute below command.
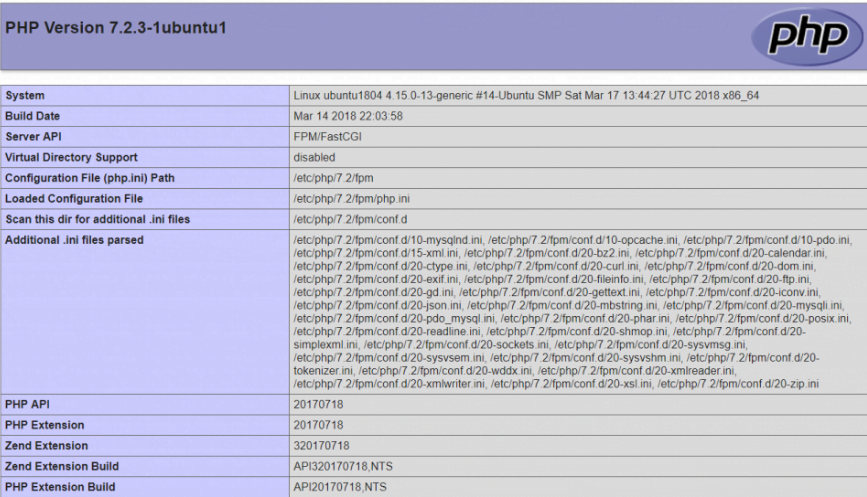
php --versionYour output may vary depending on your version of PHP installation, however sample output is as follows. This indicates that php version 7.2.3 has been installed.
PHP 7.2.3-1ubuntu1 (cli) (built: Mar 14 2018 22:03:58) ( NTS )
Copyright (c) 1997-2018 The PHP Group
Zend Engine v3.2.0, Copyright (c) 1998-2018 Zend Technologies
with Zend OPcache v7.2.3-1ubuntu1, Copyright (c) 1999-2018, by Zend Technologies
Now we need to start the service and enable it.
$sudo systemctl php7.2-fpm start
$sudo systemctl php7.2-fpm enable
Also Read:
Configure Nginx for PHP
Now we need to update nginx default configuration file, be default it is located at /etc/nginx/sites-available/default
To update this file, we will use `vi` as our code editor you may use `nano` or any other editor of your choice. following changes are to be made in order for Nginx to correctly communicate with PHP socket.
$sudo vi /etc/nginx/sites-available/defaultPress i to insert the code. this line fastcgi_pass unix:/var/run/php/php7.0-fpm.sock; should be updated as fastcgi_pass unix:/var/run/php/php7.2-fpm.sock;
index index.php index.html index.htm index.nginx-debian.html;
server_name YOUR_DOMAIN IP_HERE;
 location ~ \.php$ {
                include snippets/fastcgi-php.conf;
        #
        #       # With php-fpm (or other unix sockets):
                fastcgi_pass unix:/var/run/php/php7.2-fpm.sock;
        #       # With php-cgi (or other tcp sockets):
        #       fastcgi_pass 127.0.0.1:9000;
        }
press escape key following : + w + q to write the changes to file and quit, then restart the Nginx service
$nginx -t
nginx: the configuration file /etc/nginx/nginx.conf syntax is ok
nginx: configuration file /etc/nginx/nginx.conf test is successful
$sudo systemctl restart nginx
Test Your Work
To check PHP is properly communicating with nginx, lets create a PHP file in root directory /var/www/html/ called info.php. Use your test editor to create file info.php
$sudo vi /var/www/html/info.phpPress i to get into insert mode of vi editor and paste following code.
<?php
phpinfo();?>
Save & close the editor (escape + : + w + q)
Now go to web browser and type URL of your website followed by /info.php, like inf your are using localhost it should look like.
localhost/info.php
if you are seeing this page, congratulations!! You have successfully installed LEMP stack on your ubuntu machine.
Thats all for now, in this post you learn to install LEMP on your Ubuntu machine. I hope this is been informative for you & i would like to thank you for viewing.