Install Nagios Monitoring Tool on Ubuntu 18.04
In this tutorial, we will learn to install Nagios on Ubuntu machine. For those who don’t know what is Nagios, Nagios is an Open Source Network Monitoring Tool for remotley monitoring of nodes on the network via agents installed on those nodes. These agents can send alerts to to administrators via SMS and/or email regarding any incident which might had happended on our remote machines.
Pre-requisites
- Apache & PHP Installation to serve the Nagios Web Dashboard
- Root Privileges
- Optionally, you can setup Let’s Encrypt to setup HTTPS Support.
This setup required 2 linux machines, one as Nagios Core Server & other one as Nagios Client. So lets get started.
Step 1 – Install Package Dependencies
- We are installing Nagios Core From source to get latest feature, security updates & bug fixes. So login to your ubuntu server with root privileges, update & upgrade its packages.
#sudo apt update && upgrade -y
- Now install Nagios dependencies, apache & PHP modules as follows:
#apt install php apache2 libapache2-mod-php wget unzip zip autoconf gcc libc6 make apache2-utils libgd-dev -y
- Now create nagios user and assign it to www-data group to run Nagios process under this user.
#useradd nagios
#usermod -aG nagios www-data
- To install latest stable release, visit Nagios Downloads Page, Copy the latest stable release and download using “wget” in your home directory.
#wget https://assets.nagios.com/downloads/nagioscore/releases/nagios-4.4.6.tar.gz
- Extract the Nagios package and go to the extracted Nagios directory. Then start to compile Nagios from sources with apache sites-enabled directory configuration as per below command.
#tar xzf nagios-4.4.6.tar.gz
#cd nagios-4.4.6/
#./configure --with-httpd-conf=/etc/apache2/sites-enabled
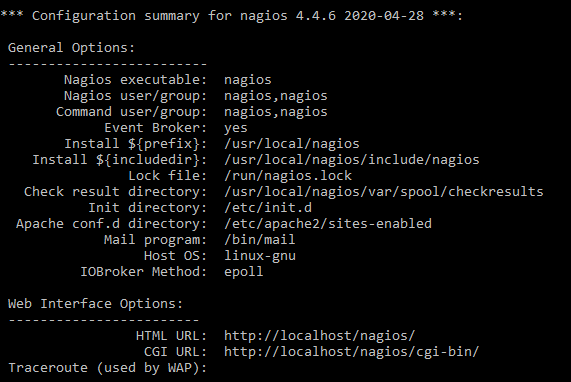
Final Output After Executing Above Command
- In next step, build and Install Nagios binary files & install Nagios, its init files & its default configuration files. Make sure to enable Nagios service before installing Nagios configuration
#make all && make install && make install-init && make install-commandmode
#systemctl enable nagios.service
#make install-config
Then install Apache Configuration for Nagios, activate related modules & restart apache service after changing directory to “cd /etc/apacahe2/sites-enabled/”
#cd /etc/apacahe2/sites-enabled/
#make install-webconf
#a2enmod rewrite cgi
#systemctl restart apache2
Now at this point you have completed the Nagios installation process. Now we need to open ports on our firewall, if you need more information how to setup ufw firewall, visit here.
#sudo ufw allow Apache
#sudo ufw reload
Step 2 – Nagios Plugin Installation
Nagios monitors remote hosts using the Nagios Remote Plugin Executor ( NRPE). Both of these are available in ubuntu repositories by default.
sudo wget https://github.com/NagiosEnterprises/nrpe/releases/download/nrpe-4.0.2/nrpe-4.0.2.tar.gz
Extract the tar file.
tar zxf nrpe-4.0.2.tar.gz
Change directory to extracted directory & Configure the plugin.
#cd nrpe-4.0.2
#./configure
Now make & install check_nrpe plugin.
sudo make check_nrpe
sudo make install-plugin
Step 3 – Nagio Configuration
Open the following main configuration file in your favorite text editor:
sudo vim /usr/local/nagios/etc/nagios.cfg
Find this line in the file:
#cfg_dir=/usr/local/nagios/etc/servers
Uncomment this line by deleting the # character from the front of the line, this will look like so.
cfg_dir=/usr/local/nagios/etc/servers
Save the file and exit the editor. Now we need to create the directory that will store the configuration file for each node that you will monitor:
sudo mkdir /usr/local/nagios/etc/servers
Now open the Nagios contacts configuration file (sudo vim /usr/local/nagios/etc/objects/contacts.cfg) in your favorite text editor to add your email address.
define contact{ contact_name nagiosadmin use generic-contact alias Nagios Admin email your_email@your_domain.com |
Save and exit the editor. Next add a new command to your Nagios Commands configuration file that lets you use the check_nrpe command in Nagios service definitions.
define command{ command_name check_nrpe command_line $USER1$/check_nrpe -H $HOSTADDRESS$ -c $ARG1$ } |
Now configure Apache to serve the Webpage of Nagios, Also enable CGI & rewrite modules like so.
| sudo a2enmod rewrite sudo a2enmod cgi |
Step 4 – Create nagiosadmin User
After installing the Nagios Core, we will add the basic authentication for accessing the Nagios dashboard. And we will be using the basic Apache Web authentication. Create a new apache basic authentication for the user the “nagiosadmin”.
sudo htpasswd -c /usr/local/nagios/etc/htpasswd.users nagiosadmin |
Now type in Nagios Server IP Address in Web Browser, type in user nagiosadmin & with password you just created.
Now you have successfully logged into your freshly installed Nagios Server. Next we shall learn to install nagios our client side as well as configure it so that remote devices can be monitored remotely.
Thats all for now, in this lesson we learn to install and configure nagios on Ubuntu Server, i hope this is been informative for your & i would like to thank you for viewing.