Introduction
Juniper SRX Firewall is a high-performance security device that offers advanced security features such as intrusion detection and prevention, VPN connectivity, and content filtering. One of the most important features of Juniper SRX Firewall is its security zones, which provide a logical separation of network traffic based on security policies. In this article, we will discuss the Juniper SRX Firewall security zones configuration, their importance, and best practices.
What are Security Zones?
Security zones are logical groupings of network interfaces that are configured to have specific security policies. Each zone represents a different level of trust and provides a boundary between different areas of the network. Traffic between zones is controlled using security policies, which are configured to allow or deny specific types of traffic.
Importance of Security Zones
Security zones are important because they provide a way to control network traffic and enforce security policies. By separating network traffic into different zones based on their level of trust, administrators can apply different security policies to each zone. This helps to protect critical resources and prevent unauthorized access to sensitive data. Security zones also make it easier to troubleshoot network issues and monitor network activity.
Types of Security Zones
Juniper SRX Firewall supports several types of security zones, including:
Untrust Zone
The untrust zone is typically used to represent the internet or any external network that is not trusted. This zone is used to control traffic coming from the internet and enforce security policies to protect the internal network.
Trust Zone
The trust zone represents the internal network or any network that is considered to be trusted. This zone is used to control traffic between different parts of the internal network and enforce security policies to protect critical resources.
DMZ Zone
The DMZ zone is used to represent a network segment that is accessible from both the untrust and trust zones. This zone is typically used to host public-facing servers, such as web servers, that need to be accessible from the internet but need to be isolated from the internal network.
VPN Zone
The VPN zone is used to represent the network segment that is used for VPN connectivity. This zone is typically used to allow remote users to connect to the internal network securely.
Juniper SRX Firewall Security Zones Configuration is a crucial aspect of network security that allows you to group interfaces and devices into separate zones based on their security requirements. By creating security zones, you can control traffic between different parts of your network and ensure that traffic is isolated and secured.
To configure security zones in Juniper SRX Firewall, you need to follow these steps:
Create the security zones:
The first step in configuring security zones is to identify the interfaces that you want to associate with each zone. You can then create the security zones using the set security zones security-zone command and specify a name for each zone. For example, set security zones security-zone management creates a security zone named “management.”
To create security zones in Juniper SRX Firewall, you need to use the set security zones security-zone command and specify a name for each zone. Let’s say we want to create a security zone for the management interface. Here’s an example configuration:
set security zones security-zone managementThis command creates a security zone named “management.”
Once you have created the security zone, you can associate interfaces with it using the interfaces statement in the set security zones security-zone command. For example, let’s say we want to associate the ge-0/0/0.0 interface with the “management” security zone. Here’s the configuration:
set security zones security-zone management interfaces ge-0/0/0.0This command associates the ge-0/0/0.0 interface with the “management” security zone.
You can also associate multiple interfaces with a security zone using a wildcard. For example, to associate all interfaces starting with ge-0/0/ with the “management” security zone, you can use the following configuration:
By creating security zones and associating interfaces with them, you can control traffic between different parts of your network and ensure that traffic is isolated and secured.
Associate interfaces with the security zones:
Once you have created the security zones, you can associate interfaces with them using the interfaces statement in the set security zones security-zone command. For example, set security zones security-zone management interfaces ge-0/0/0.0 associates the ge-0/0/0.0 interface with the “management” security zone.
Point 2 of configuring Juniper SRX Firewall security zones is to associate interfaces with the created security zones. Once the security zones have been created, you need to specify which interfaces belong to each zone. This is done using the interfaces statement in the set security zones security-zone command.
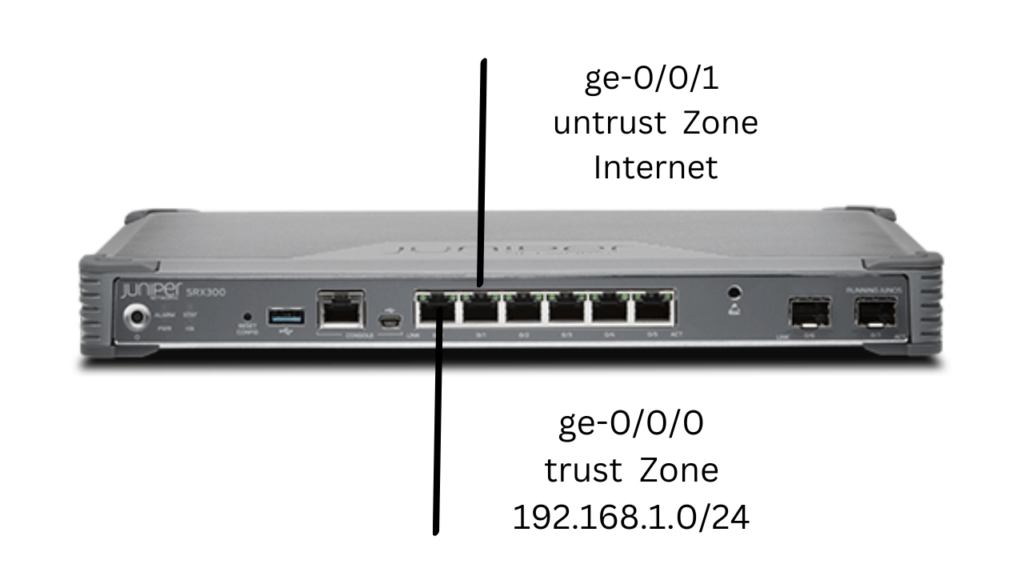
For example, let’s say we have created two security zones named “trust” and “untrust,” and we want to associate the ge-0/0/0 interface with the “trust” zone and the ge-0/0/1 interface with the “untrust” zone. Here’s the configuration:
set security zones security-zone trust interfaces ge-0/0/0
set security zones security-zone untrust interfaces ge-0/0/1
This configuration specifies that the ge-0/0/0 interface belongs to the “trust” security zone and the ge-0/0/1 interface belongs to the “untrust” security zone.
You can also use a wildcard to associate multiple interfaces with a security zone. For example, to associate all interfaces starting with ge-0/0/ with the “untrust” security zone, you can use the following configuration:
set security zones security-zone untrust interfaces ge-0/0/*This configuration associates all interfaces starting with ge-0/0/ with the “untrust” security zone.
RECOMMENDED
PROCEDURE TO UPGRADE JUNOS FROM CLI
Define security policies:
After you have created and associated interfaces with the security zones, you can define security policies to control traffic between the zones. You can use the set security policies from-zone and set security policies to-zone commands to define policies that allow or deny traffic between specific zones.
Defining security policies is a critical step in configuring Juniper SRX Firewall security zones. Once security zones and interfaces have been created and associated, security policies are used to control the flow of traffic between different zones.
A security policy is a set of rules that determine what traffic is allowed to pass through the firewall and what traffic is blocked. Each security policy consists of a source security zone, a destination security zone, and a set of conditions that determine whether traffic is allowed or blocked.
To define a security policy, you need to use the set security policies from-zone command. Let’s say we want to allow traffic from the “trust” zone to the “untrust” zone. Here’s an example configuration:
set security policies from-zone trust to-zone untrust policy allow-all match source-address any destination-address any application any then permitThis configuration creates a security policy named “allow-all” that allows traffic from the “trust” zone to the “untrust” zone. The match statement specifies that the policy matches all traffic with any source address, destination address, and application. The then statement specifies that traffic matching the policy should be permitted.
You can also create more specific security policies that allow or block traffic based on specific conditions. For example, let’s say we want to allow HTTP traffic from the “trust” zone to the “untrust” zone. Here’s an example configuration:
set security policies from-zone trust to-zone untrust policy allow-http match source-address any destination-address any application junos-http then permitThis configuration creates a security policy named “allow-http” that allows HTTP traffic from the “trust” zone to the “untrust” zone. The match statement specifies that the policy matches traffic with any source and destination address and the Junos HTTP application. The then statement specifies that traffic matching the policy should be permitted.
By defining security policies, you can control the flow of traffic between different security zones and ensure that traffic is properly secured and isolated.
Recommended
By configuring security zones and policies in Juniper SRX Firewall, you can protect your network from potential security threats and ensure that traffic is isolated and secured between different parts of your network. For example, you can create a “public” security zone for interfaces that are exposed to the internet and a “private” security zone for internal interfaces. You can then define policies that allow traffic from the “public” zone to the “private” zone only for specific services or applications.
In conclusion, Juniper SRX Firewall Security Zones Configuration is a critical aspect of network security that helps to protect your network from potential security threats. By following the steps outlined above, you can create security zones and policies to control traffic between different parts of your network and ensure that your data is secure.